Bring the magic of the beach straight to your home or classroom with this engaging arts and crafts activity! The Ocean Inspired Acrylic Pour for Kids is a colorful sensory exploration full of fun and just the right amount of messiness. Kids will love learning about color mixing as they create their very own oceans and will be mesmerized as they pour their unique mixture onto their blank canvas creating a unique masterpiece!
What is Acrylic Pouring?
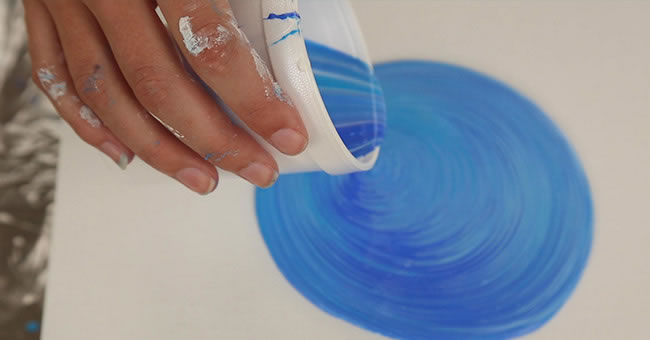
Acrylic pouring is a painting technique that allows artists of all skill levels to easily create one-of-a-kind works of art. In this technique, acrylic paint is mixed with a pouring medium and then poured onto a surface, like a blank canvas, in different ways to create unique color mixtures. Sometimes artists choose to pour different colors from individual cups and other times multiple colors are combined into one cup and poured onto the surface together.
After you have poured your paint, the surface you wish to cover is tilted in different directions allowing the paint flow freely, covering the surface completely. Watching the interesting ways colors combine and interact is a fascinating experience for adults and children alike! No matter which method of paint pouring you use, the artwork you create is completely original and the perfect piece of art for home or school.
Why is Sensory-Based Learning Important?
In order for young children to explore and understand new information, they must exercise the use of their senses. Sensory play is an engaging way of stimulating a child's senses through touch, sight, taste, smell, or hearing to naturally facilitate learning. It is important to provide opportunities for sensory play because it fosters cognitive, language, and fine and gross motor development in children. It also empowers young learners to problem solve, think critically, and build skills for positive social and emotional health.
How Can I Use This In My Lesson Plan?
Perfect for home or school, the Ocean Inspired Acrylic Pour for Kids is an engaging arts and crafts activity that not only supports sensory learning but also inspires creative explorations and open-ended play. Easy to incorporate into lesson plans for virtual or face-to-face instruction, this activity allows children to connect through art and a unique sensory experience whether they are together or apart.
For example, encourage children to share their feelings and stories about the ocean or guess how their colors will mix and what their masterpiece will look like once dry. This interdisciplinary activity can even be used as a moment of mindfulness as children take the time to create with intention and reflect on the calming art they have made. The learning possibilities with this acrylic pour activity are as vast as the ocean!
Download our FREE printable below!

Required Materials:
- White Glue
- Water
- Washable Acrylic Paint
- Mixing Cups
- Blank Canvas
- Play Sand
- Seashells
1Gather Your Materials
Before creating your acrylic pour, you must first gather the needed materials and, on a clean work surface, mix together your pouring medium. A pouring medium helps thin the paint, allowing it to flow more easily without affecting the paint's color. To make a pouring medium, mix glue and water together in a 1:1 ratio or 1 part water for each part glue. For example, if you add 1 tbsp of water to your medium you would also add 1tbsp of glue to maintain this ratio. Grownups may want to mix the pouring medium before this activity to save time.
2Mix Your Paint
Choose your ocean-inspired colors and pour a little of each color into the individual mixing cups you have ready. Add your pouring medium to each color and stir to combine. Be sure to use a clean popsicle or stirrer stick with each color to prevent unwanted color mixing. Once your colors and pouring medium are well-mixed in their individual cups, pour each color into one cup, layering them for a unique mixture. Do not mix the paint in this step, layering the colors creates the unique results of your acrylic pour!
3Pour!
Time to get messy! Encourage children to pour the paint over their blank canvas. Once all your paint has been poured onto the canvas, carefully tilt the canvas in all directions to move the paint so that it covers the entire surface of the canvas.
4Customize Your Creation
Once your canvas is dry, apply a thin layer of glue to across the bottom. Sprinkle sand across the glue while wet and shake off any excess sand. Once your sand is glued in place, allow children to choose their favorite seashells or other ocean-themed loose parts and glue them to the sand to create a beach of their very own! Display at home or school for a one-of-a-kind masterpiece children will love to show off.
Encourage creative explorations with engaging arts and crafts activities! Browse our selection of related activities to incorporate art into your home or classroom.
