Fall is back and what better way is there to celebrate its return than by making a decorative DIY Pumpkin Yarn Garland? This simple and fun arts and crafts activity is a wonderful way to embrace the autumn spirit! Not only does this activity give children an opportunity to engage with their innermost creativity, but they'll also have a fun and festive fall decoration by the end of it.
What Is A Pumpkin Yarn Garland?
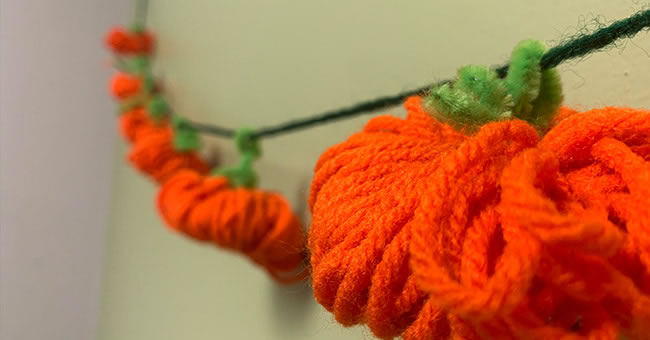
Perfectly capturing the energy of fall, the DIY Pumpkin Yarn Garland is a quick and easy arts and crafts activity that kids will be sure to enjoy! Made entirely from yarn and tied together with chenille stems, the Pumpkin Yarn Garland requires very few materials and can get your classroom decorated in no time. Children will admire the decorations on the wall with a sense of pride knowing that it's the result of their own creativity.
How Can I Use This In My Lesson Plan?
Putting together DIY Pumpkin Yarn Garlands doesn't only serve as a fun arts and crafts activity meant for decorative purposes. It's also a great way to introduce children to the Fall Harvest and teach them more about what makes fall so special. Pumpkins are one of the most iconic crops that are harvested in the fall season which makes this the perfect activity to teach kids all about the harvest season and how it is celebrated around the world.
The Fall Harvest is a time where people express gratitude for a successful year of harvesting crops through celebration. Different cultures partake in different celebrations across the world such as Thanksgiving in America, the Rice Festival in Indonesia, the Mid-Autumn Festival in China, and many more! You can use the DIY Pumpkin Yarn Garland activity as a way to teach kids the science behind growing crops and about the culture surrounding the Fall Harvest.
The DIY Pumpkin Yarn Garland is a great way to let kids express their creativity through decorations while also learning more about people and cultures around the world.
Download our FREE printable below!

Required Materials:
1Gather Your Materials
Gather orange and green yarn, green chenille stems, and a pair of scissors to begin creating your pumpkin garland. This activity is easy to accommodate for at-home learning — simply send out a materials list ahead of time to families so every child can participate.
2Create Your Pumpkins
Have children begin by wrapping the orange yarn around their hand until they have created a small ball of yarn. Help them cut the yarn from the skein and then carefully remove the yarn from their hand. Place the ball of yarn on a flat surface and tie a knot around the ball using another piece of orange yarn. Next, help the kids cut a green chenille stem in half and run the stem through the top of the yarn ball. From here, just have them twist each side to make their pumpkin stem (as demonstrated in the video) and your pumpkin is created!
3Put Your Pumpkins on the Garland
Now that your pumpkins are ready, it's time to put the garland together. Take a long piece of green yarn and run it through the pumpkin stems. Display your pumpkin garland in your classroom for a fun fall decoration!
Celebrate the return of fall with this activity and more! Browse our selection of classroom arts and crafts and other seasonal activities to embrace fall to the fullest.
