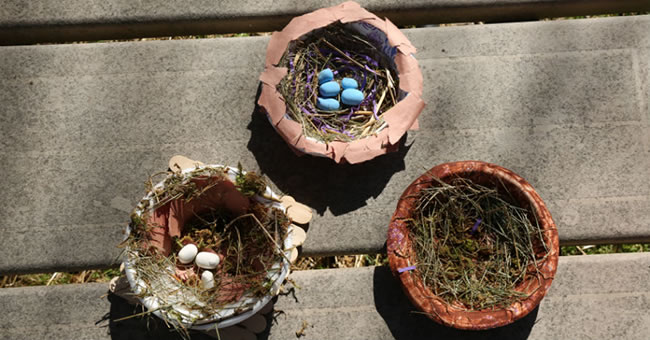
If you're looking for a fun spring or summer craft that provides plenty of learning opportunities for the children in your care, we have just the activity you're looking for! Our DIY Bird Nests craft is a great way for children to learn about nature and life science.
Before the Activity
Take a Nature Walk: Take children on a nature walk around your school or center to find some of the natural materials that birds use to make their nests. See if the children can spot any real bird nests in the trees and bushes you pass during the nature walk.
Study Birds: Another way you can extend the activity is by having children research different types of birds that are common in your area. Have them draw a picture of the bird or form a model of it with clay or another sculpting material. Use dough or clay to place a few bird eggs in the nest alongside of the picture or model of the bird the children researched. Be sure to also have them research where each type of bird builds its nest. Some birds build their nests close to people in sheds or garages, while other birds prefer for their nests to be in more wooded areas.
Download our FREE printable below!

Required Materials
- Foam or Paper Bowls
- Glue
- Brown Tempera Paint
- Paint Brush
- Brown Construction Paper
- Craft Sticks
- Natural Materials (Grass, Sticks, Hay, Leaves)
- Man-Made Materials (Paper, Yarn, Artificial Grass, Floral Moss)
- Plush Birds (Optional)
- Model Magic Primary Colors (Optional)
1Option 1
- Apply glue to the bowl: With the exception of the bottom of the bowl, spread glue on the outside of the bowl.
- Tear paper and apply to the bowl: Tear brown construction paper (or green if you prefer) into small and large pieces, and then apply them to the outside of the bowl. If desired, add glue to the rim of the bowl and cover it with construction paper pieces.
- Apply glue to the inside: Spread a decent amount of glue on the inside of the bowl.
- Add nesting materials: Add a variety of materials, such as grass and paper, to cover the inside of the bowl and make it look like a bird nest.
2Option 2
- Paint bowl brown and let dry: With the exception of the bottom of the bowl, paint the outside of the bowl brown. Let the bowl dry.
- Paint the inside brown and let dry: Cover the rim and inside of the bowl with brown paint. Let the bowl dry.
- Add nesting materials: Once all of the paint is dry, put some natural and/or man-made materials inside of the bowl to make it look like a bird nest. You may want to use glue to help the materials stick to the bowl.
3Option 3
- Make a base for the bird's nest: Children can make a sturdy base for their bird nest by gluing together craft sticks. Simply put nine craft sticks side by side, make supports with three other craft sticks, and glue on the supports.
- Wrap yarn around the outside of the bowl: Take brown, yellow, or white yarn and wrap it around the bowl a few times.
- Add nesting materials: Use the natural and/or man-made materials to stick through the yarn and alongside the exterior of the bowl to make it look like a bird's nest. Once the outside is done, add additional nesting materials on the inside of the bowl. You may want to use glue to help the materials stick to the bowl.
